Spend Over £500 To Get Free UK Delivery - Excludes Certain Postcodes & Round Ice Baths

How to Set Up Your Urban Ice Tribe Sauna Tent: A Complete Step-by-Step Guide

Transform your outdoor space into a personal wellness retreat with the Urban Ice Tribe Sauna Tent. This detailed setup guide walks you through every step, from unboxing to your first steam session, blending practical instruction with the mindful ritual of heat therapy.
outdoor sauna tent

There’s something primal and deeply restorative about sitting in the heat of your own sauna — surrounded by nature, enveloped in warmth, breath steady, body softening.
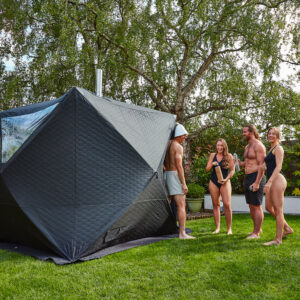
With the Urban Ice Tribe Sauna Tent, that experience can happen anywhere: your garden, a lakeside retreat, or the heart of the wilderness.

Designed for performance, portability, and connection, the Urban Ice Tribe Sauna Tent brings authentic heat therapy into your world with simple setup, durable materials, and effortless warmth.
This guide walks you through the entire process — from unboxing to your first sauna session — so you can get the most from your new tent safely and easily.

What’s Included

sauna tent

Before you begin, unpack your sauna tent and check that all components are present and in good condition. Each kit includes everything you need to create a complete outdoor sauna experience:

  • Pop-up sauna tent
  • Sauna stove or heater (wood-burning or electric, depending on your model)
  • Sauna rocks
  • Exhaust pipe or chimney for wood-burning stoves
  • Heat-resistant mat or base protector
  • Carrying bag
  • Assembly manual

If anything is missing or damaged, contact the Urban Ice Tribe support team before you begin setup. Taking a few minutes to check all components ensures your tent goes together smoothly and safely.

Choosing the Perfect Location

Your sauna experience begins with where you place it. The right location not only affects stability and ventilation but also enhances the atmosphere of your sessions.

Safety and Setup Basics:

  • Choose a flat, stable surface free of sharp objects.
  • Ensure the area is well-ventilated, especially for wood-burning stoves.
  • Keep at least two metres of clearance from flammable materials like trees, fences, or walls.
  • Avoid low-lying areas prone to pooling water.

Create the Right Setting:
If you have the space, choose somewhere that feels calm and connected — a quiet garden corner, lakeside view, or natural backdrop. The sauna tent is designed to merge seamlessly with its surroundings, turning your heat session into a grounding ritual.

Step-by-Step Setup Guide

1. Unfolding and Assembling the Tent

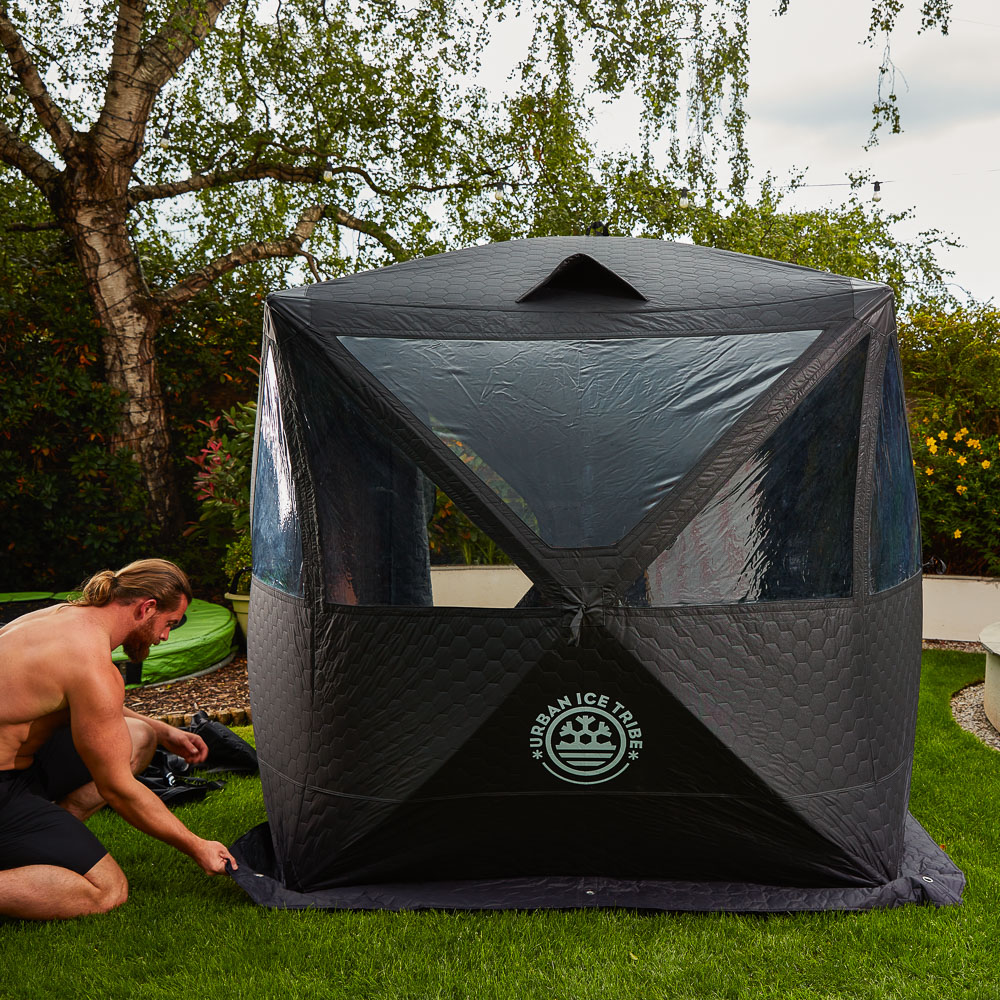
The Urban Ice Tribe Sauna Tent uses a pop-up system for quick, intuitive setup.

  1. Remove the tent from the carrying bag and allow it to expand naturally.
  2. Using the pull tabs on each side, gently pop out each panel until the tent takes full shape.
  3. Secure the tent to the ground with the provided stakes or add weights at the corners to ensure stability in wind or uneven terrain.

Check that all zips and seams are properly aligned, and the floor area is smooth and free of debris before proceeding.

2. Installing the Heater and Flue System

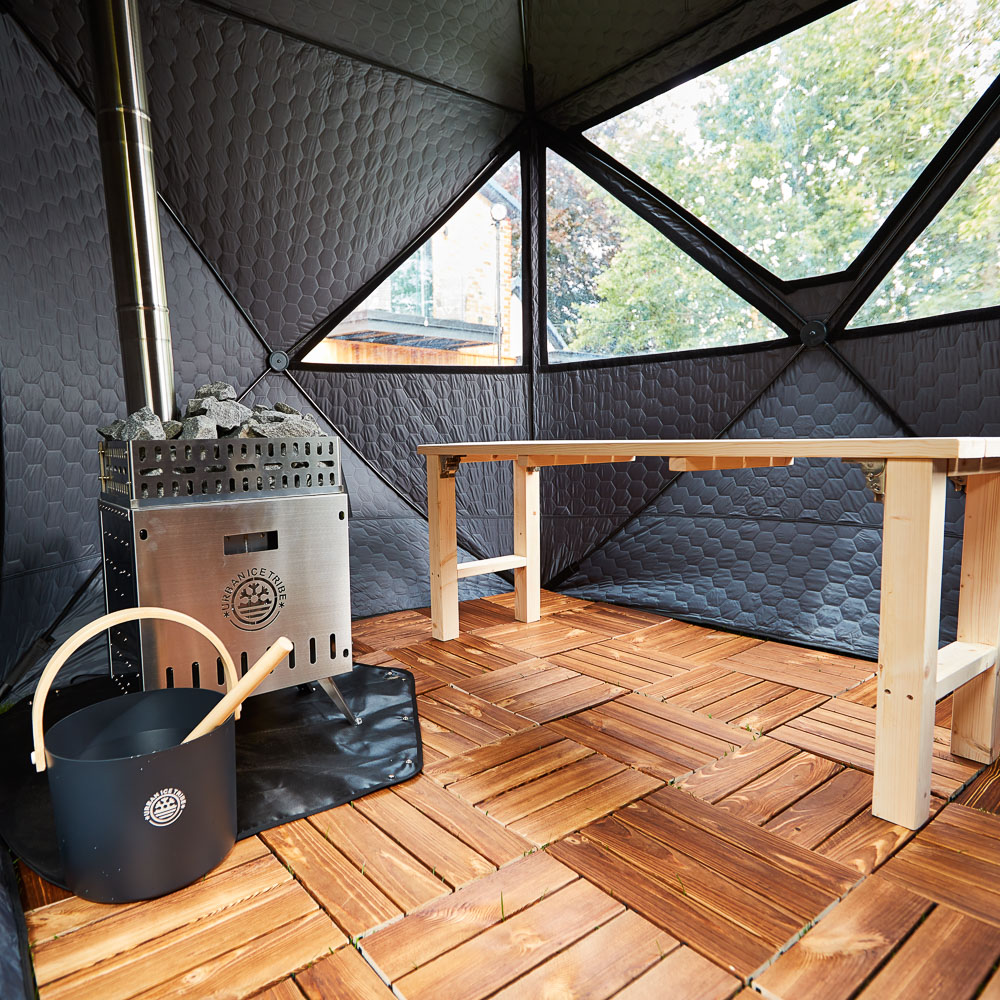
Your sauna stove is the heart of the experience. Whether wood-burning or electric, placement and ventilation are essential.

For Wood-Burning Models:

  • Position the stove inside the tent, directly below the opening in the roof.
  • Attach the exhaust pipe (chimney) through the flue hole, ensuring it vents safely outside the tent.
  • Secure all pipe sections tightly and check that the flue sits vertically.
  • Place the heat-resistant mat beneath the stove for protection and stability.

For Electric Models:

  • Follow the manufacturer’s safety instructions and use a power source rated for outdoor use.
  • Ensure the cord is protected from moisture and positioned safely away from walking areas.

Once installed, double-check that there’s sufficient clearance between the stove, seating area, and tent walls.

3. Preparing Your Firewood

If you’re using a wood-burning stove, fuel quality makes a big difference to heat, cleanliness, and experience.

  • Choose kiln-dried softwood, ideally birch, for efficient, clean burning.
  • Cut smaller pieces (around 1 inch thick) for the initial fire to help it establish quickly.
  • Keep medium and larger logs nearby for maintaining heat once the sauna warms up.

Avoid treated wood or materials containing adhesives, as they can release harmful fumes.

4. Lighting the Fire

Once your stove is in position and the flue is fitted securely:

  1. Open the flue valve and air vents fully for maximum airflow.
  2. Place kindling and a natural fire starter (such as dry wood wool or paper) at the base.
  3. Light the fire and allow it to establish with small pieces of wood before gradually adding larger logs.

Keep the vents open during this stage to encourage a strong burn and efficient heating.

5. Building Heat and Regulating Temperature

As the fire grows, continue to add small to medium-sized logs to build heat. Allow the sauna to reach around 90°C (194°F) before adjusting ventilation.

Once it reaches your desired temperature:

  • Partially close the flue valve and air vents to slow the burn and retain warmth.
  • Add larger logs to maintain consistent heat.
  • Allow 10–20 minutes of preheating before entering for your first session.

Avoid exceeding 100°C (210°F) — the sauna tent’s maximum safe temperature. The most comfortable range for most users is between 38°C and 54°C (100°F to 130°F) to begin with, especially for your first few sessions.

Enjoying Your First Sauna Session

sauna tent and accessories

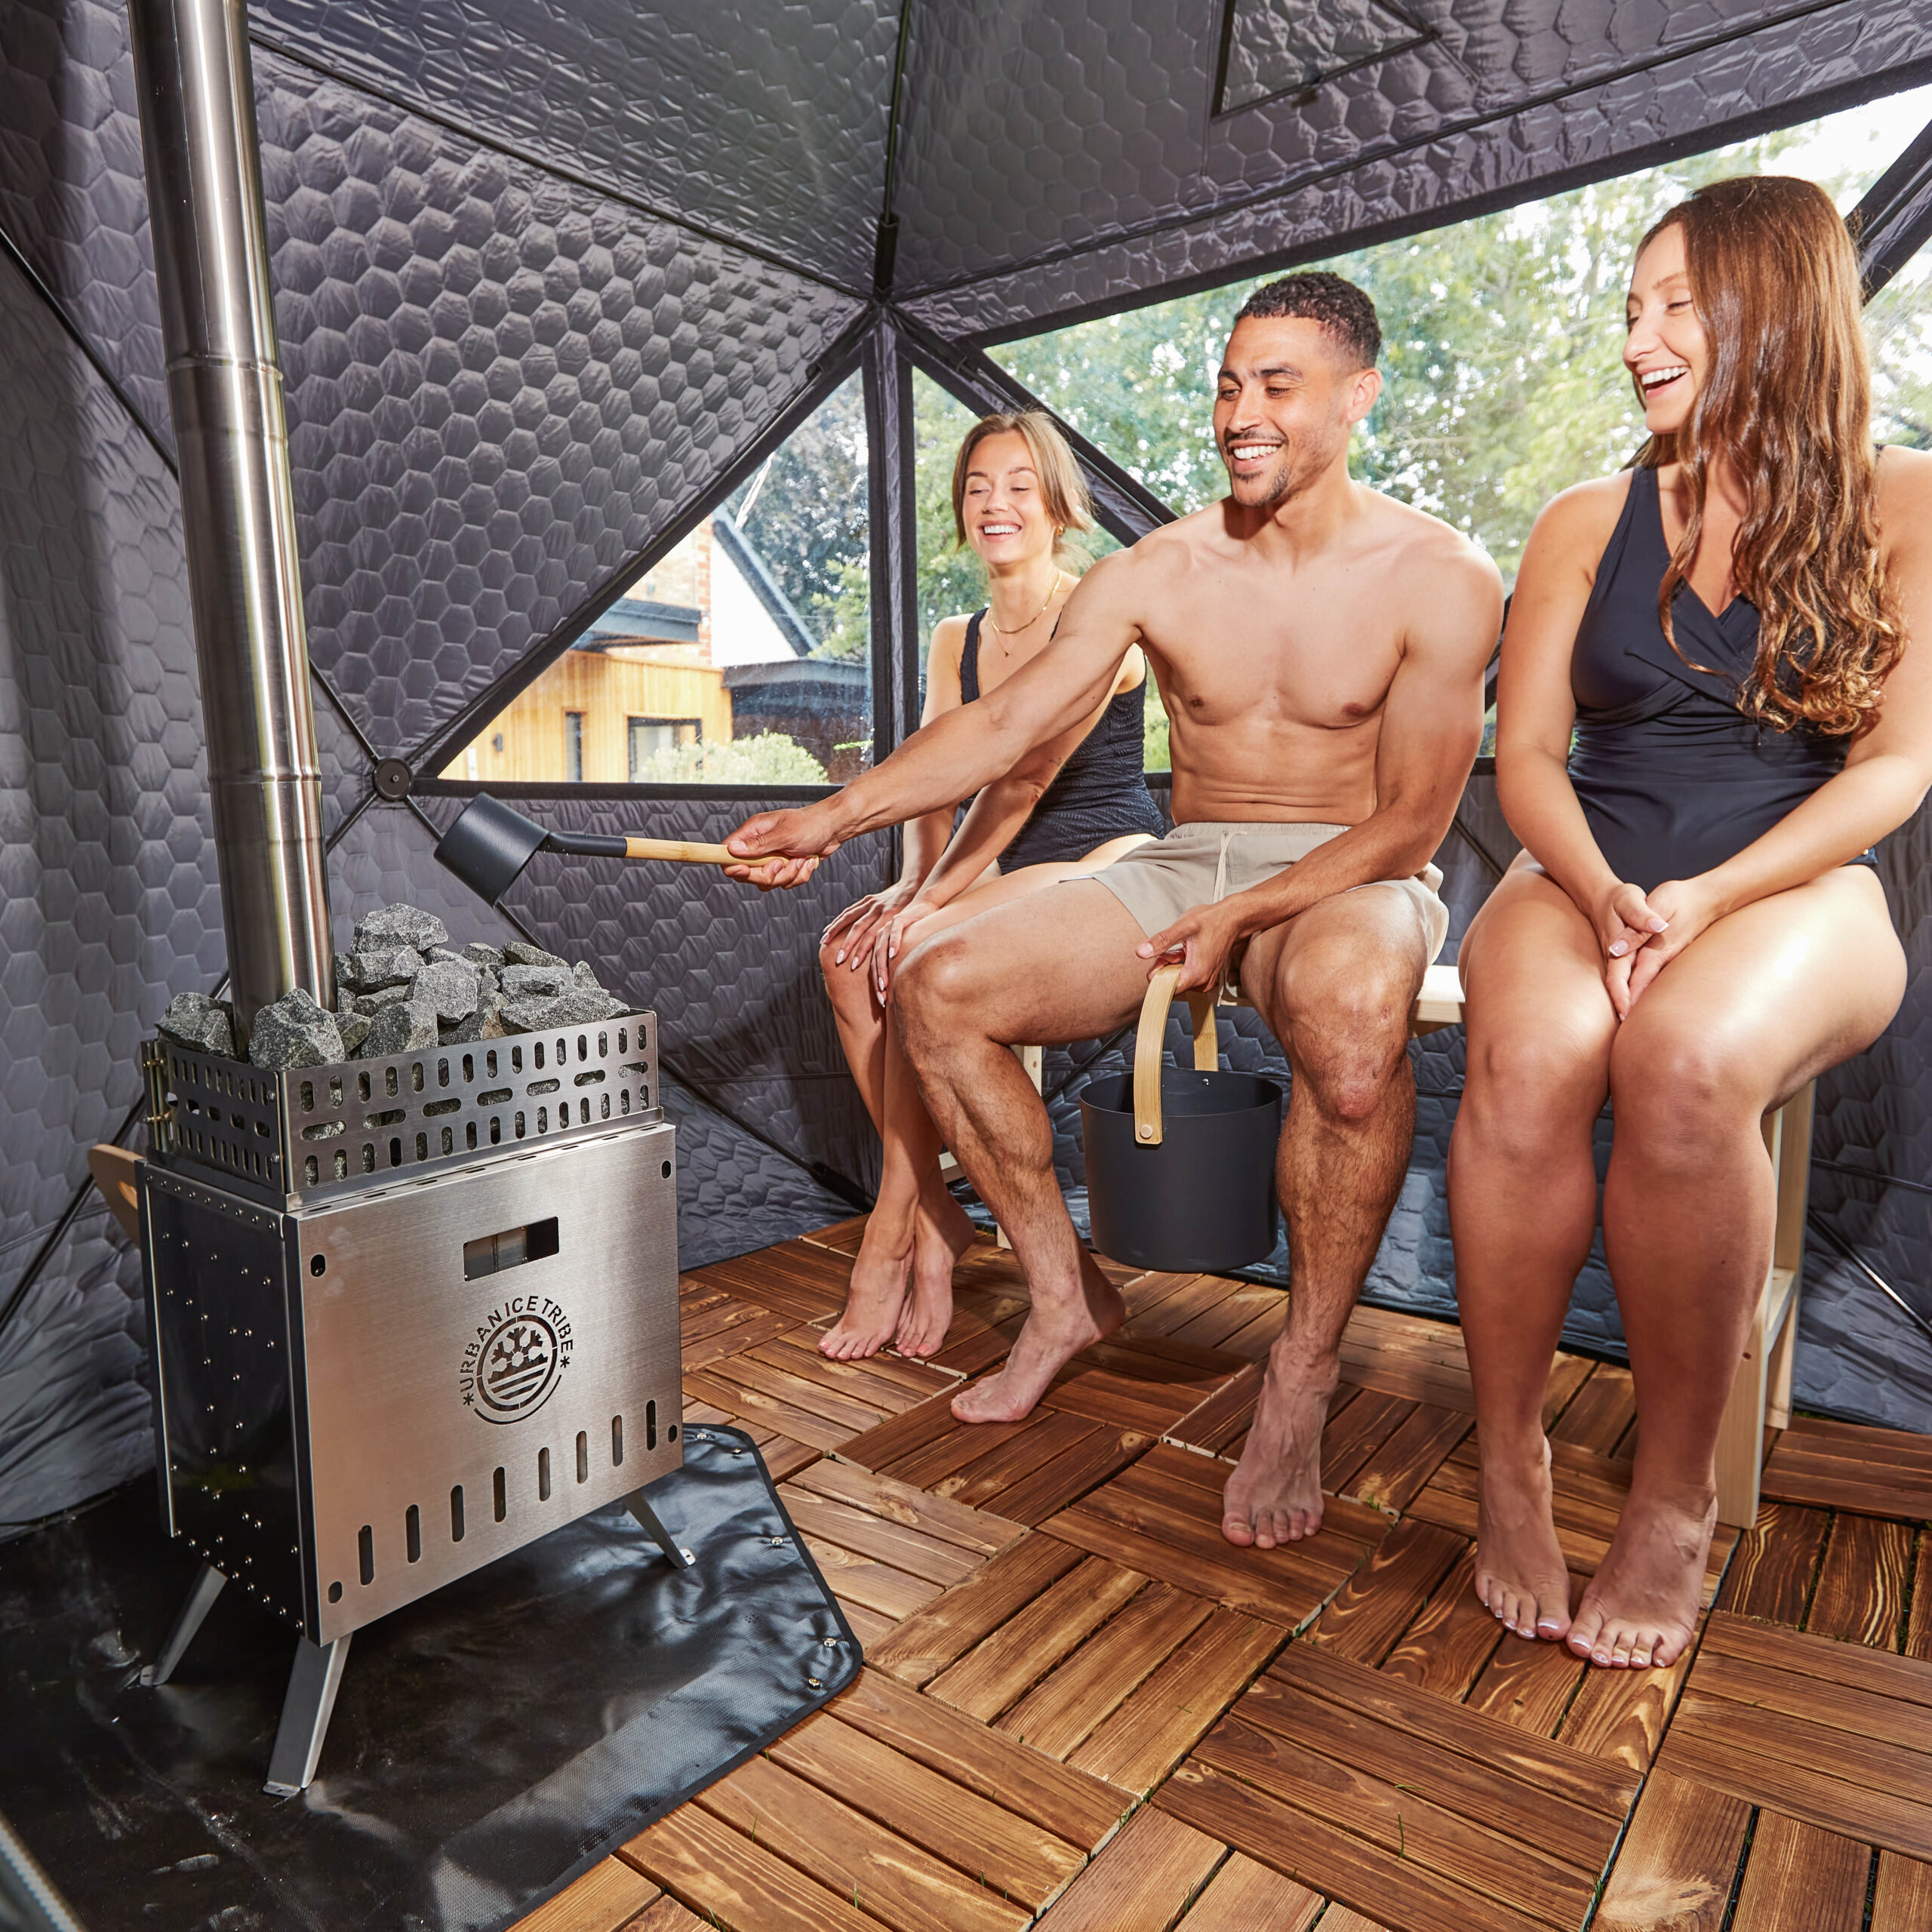
When your sauna is heated, it’s time to immerse yourself in the ritual.

  • Steam (Löyly): Sprinkle small amounts of water onto the hot sauna stones to create steam and intensify the heat.
  • Hydration: Drink plenty of water before and after your session.
  • Session Length: Start with shorter sessions (10–15 minutes) and gradually increase to 30 minutes as you adapt.
  • Airflow: Adjust vents and zips to regulate airflow — a little fresh air helps prevent stuffiness.
  • Cooling: If possible, step outside to cool off naturally or alternate with a cold plunge for a powerful contrast therapy experience.

Listen to your body. If you feel lightheaded, dizzy, or uncomfortable, exit the sauna slowly and allow your body to cool down safely.

Adjusting Heat and Airflow During Use

Fine-tuning the temperature is part of learning your sauna’s rhythm.

  • If the sauna cools too quickly, open the vents slightly to boost airflow and reignite a stronger burn.
  • If it becomes too hot, allow the fire to burn down naturally while keeping the door slightly open for ventilation.
  • Avoid overloading the stove with wood, which can smother the flame and reduce efficiency.

Experiment to find your perfect balance — the more you use it, the more intuitive it becomes.

Post-Use Care and Maintenance

Proper care keeps your sauna tent in top condition for years of use.

Cleaning After Each Session

  • Allow the stove to cool completely before handling.
  • Wipe down the tent’s interior with a damp cloth and mild soap.
  • Open doors or vents and let the tent air dry fully before storing to prevent condensation or mold.
  • Empty the stove or ash box and dispose of ashes safely once cool.

Folding and Storage

  • Ensure all parts are completely cool and dry.
  • Gently press the tent panels inward to fold it down.
  • Store the tent, stove, and accessories in the provided carrying bag.
  • Keep the bag in a cool, dry place away from direct sunlight.

Regular care preserves the integrity of the materials and makes setup quicker each time.

Troubleshooting and Safety Tips

Common Issues:

  • Smoke not venting properly: Check that the flue pipe is clear, straight, and fitted securely through the roof outlet.
  • Uneven ground or instability: Adjust stakes or weights, and ensure your stove sits level.
  • Condensation: Leave vents slightly open during heating and drying to improve airflow.

Safety Reminders:

  • Never exceed recommended temperatures.
  • Always use the sauna tent outdoors with proper ventilation.
  • Keep children and pets at a safe distance during operation.
  • Never leave the sauna unattended while the stove is burning.

A Ritual Beyond the Heat

Setting up your Urban Ice Tribe Sauna Tent is more than just assembly — it’s the start of a ritual that reconnects you with elemental balance.
Each session becomes an invitation to slow down, breathe deeply, and feel alive in both heat and cold.

Take pride in the process — every piece you put together, every log you light, every deep breath inside that rising steam. That’s where recovery and clarity meet.

For additional guidance or accessories, visit Urban Ice Tribe Sauna Tents or contact our support team for advice on care and performance.

Picture of Ryan Abbott

Ryan Abbott

Founder of Urban Ice Tribe

About

Helping men & women release anxieties & limiting beliefs to experience a life of freedom using powerful breathwork, cold water therapy, movement & sound healing.

Recent Posts

  • Ice bath and cold water therapy robe

    Osprey Changing Robe

    Select options This product has multiple variants. The options may be chosen on the product page
  • Round Ice Bath Fabric Covers

    Round Ice Bath Cover

    £144.00£171.00
    Select options This product has multiple variants. The options may be chosen on the product page
Urban Ice Tribe Founder Ryan Abbott on the Rick Cooper Show Podcast
Get The Latest Updates

Subscribe To The Urban Ice Tribe Email List

No spam, notifications only about new products, updates, offers and announcements.